
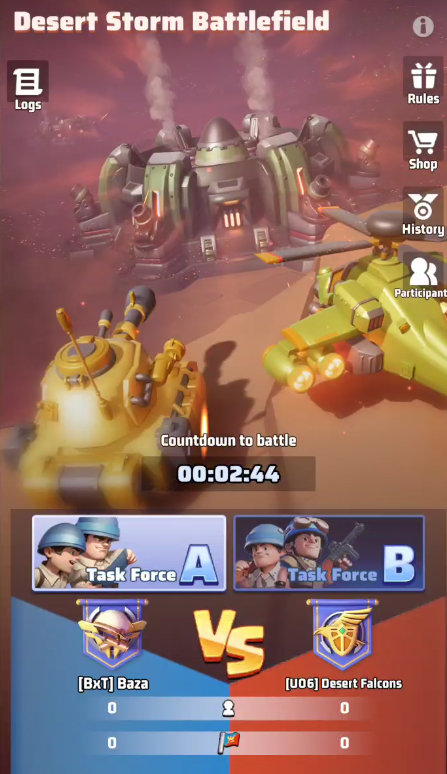
After Hurricane Katrina, a hidden weapon of mass destruction, a secret Nuclear Silo, emerges under the barren desert, detected sharply by the UN’s KH-11 satellite. The United Nations and allied forces quickly deployed soldiers to capture mysterious nuclear silo. Commander, prepare your army for the tough battle ahead! Good luck!

Contents
Overview
Desert Storm is a weekly event, where you engage in a war against another alliance with a comparable battle power in a dedicated battlefield (at first game stages it will be an alliance of your server, later on of a different server).
It is one of the most enjoyable events of the game, because of its dynamics and its rewards (Honor points, accelerators, resources, decoration chests, dieletric ceramic). Additionally you will not lose troops you use in this battle.
The drawbacks are that not all members of the alliance can participate, but lately the A-B task force feature was introduced, bringing the possibility to deploy up to 60 members in the event : 20 starting participants and 10 substitutes for each task force.
The event takes place in a dedicated battlefield, reachable through the event page when the event starts.
IMPORTANT:
- Matchmaking in this game is not great, so often unfair challenges take place
- It was confirmed by staff/devs that removing decorations or artificially dropping the alliance total power is useless because the game will use the historical total power of the alliance for the matchmaking
The Goals
There are 2 goals in the Desert Storm event:
- win the battle so to earn the alliance rewards as the winning party.
- maximize individual rewards, that include Honor Points.
During the Desert Storm it is possible to accumulate 2 types of points used in the 2 goals:
- Battlefield Points: they are counted to decide the outcome of the battle and proclaim the winning alliance.
In this game these points are referred sometimes as Alliance points.
It is possible to earn them:- capturing buildings and holding them, you need to consider the capture yield points referred as alliance
- collecting Point Supply Boxes that are scattered when a building changes owner (based on some conditions)
- gathering in Oil Wells, dispatching troops on them
- Individual Points: they are counted to decide which tier of individual rewards each participant wins
It is possible to earn them:- capturing buildings and holding them, you need to consider the capture yield points referred as individual
- killing hostile units: attack or defend buildings to kill troops. Higher-level enemies yield more points.
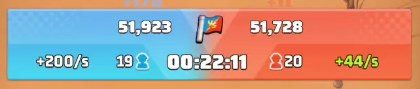
Battlefield Points and Individual Points Scoreboards
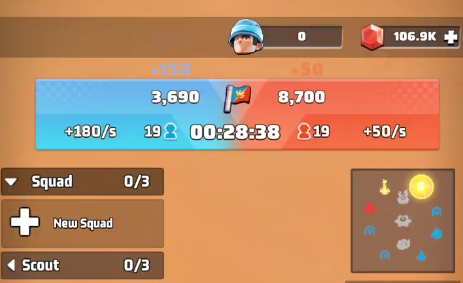
You can check the current Battlefield Points and Individual Points during the match.
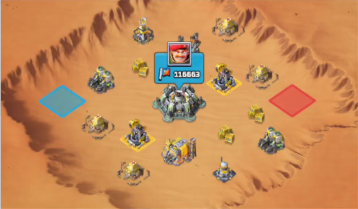
Your alliance is always shown as the blue alliance in the battlefield, your opponent is the red alliance.
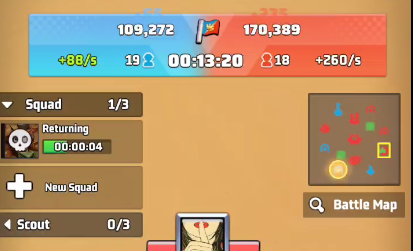
The global scoreboard, shown at the top of the screen, will show:
- Battlefield Points earned (3,690 vs 8,700)
- Current Battlefield Points yields per second, based on current buildings captured by each alliance (+180/s vs 50/s)
additionally it will provide useful information on the current situation:
- total amount of players participating (19 vs 19)
- time left before the match ends
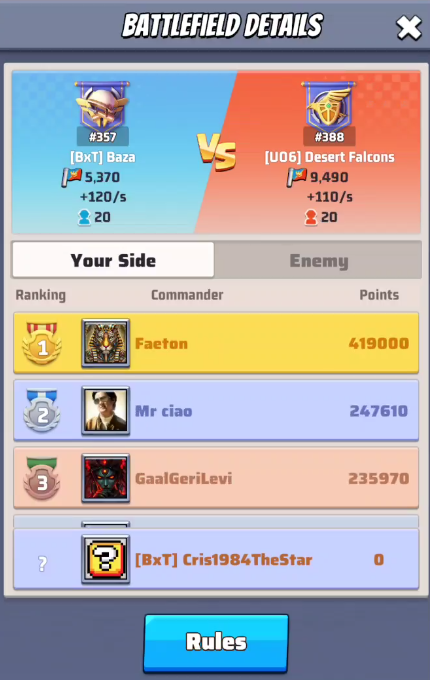
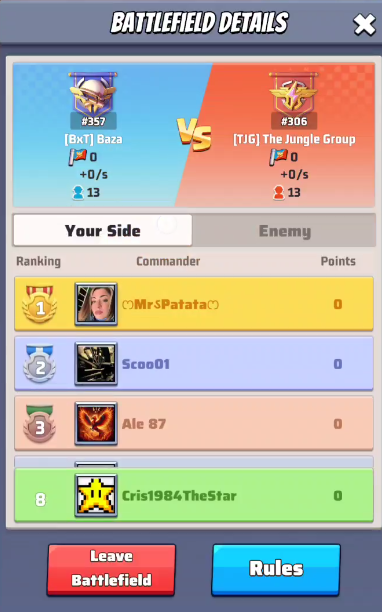
Clicking on the scoreboard you can access the Battlefield Details page, in which the players can check their Individual Points.
Consider that it is possible to see only the current amount of Individual Points and that there is no indication of current Individual Points yield from the buildings the player is garrisoning.
From here clicking on rules brings you to the event rules where you can check the amount needed to obtain the max individual rewards.
Rewards
To understand how important it is to win both the battle and the individual rewards, let’s immediately take a look at the rewards now.
Alliance Rewards
The alliance rewards are given to all the members of the alliances via mail, regardless of their participation.
They differ if you use only Task Force A or Task Force A&B.
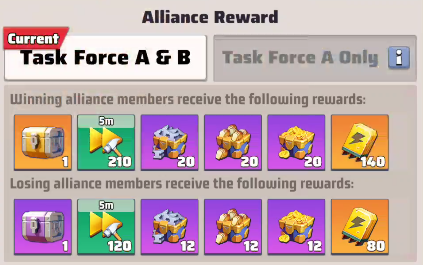
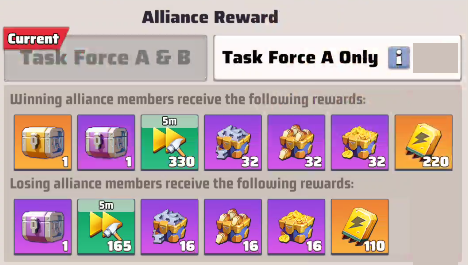
The game clearly states: Oh! Based on detailed analysis, giving up Task Force B and focusing on Task Force A gives better rewards than failing with both Task Forces! For smaller elite Alliances, it’s better to focus on Task Force A and drop Task Force B!
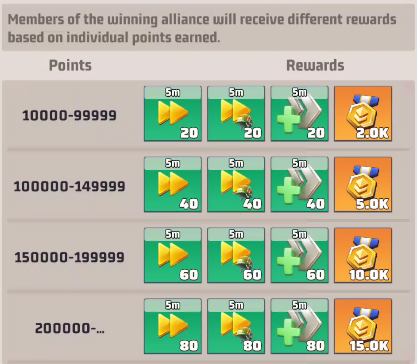
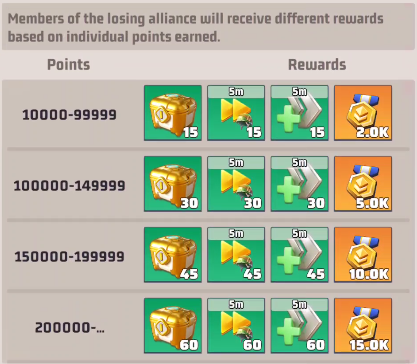
Individual Rewards
There are 2 types of individual rewards that are earned in this event, they are also sent via mail at the end of the battle.
- Participation rewards: you earn them simply by being part of the task forces

- Individual Rewards: you earn them based on how many Individual Points you score during the battle. You earn only the rewards of 1 tier. As you can see there is a minimum of 10.000 points to earn rewards, this is done to discourage people to request to be listed in the task forces and then not participate in the actual event.
Members of winning alliance:
Members of losing alliance:
Map and buildings
In this paragraph you can find are all the details regarding the buildings you can capture during the battle.
Some provide a high amount of Battlefield Points and Individual Points, others provide powerful boosts that might change the course of the battle.
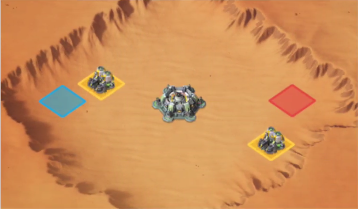
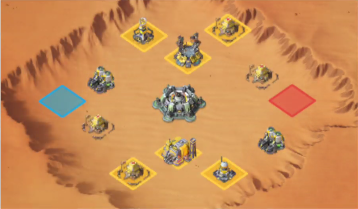
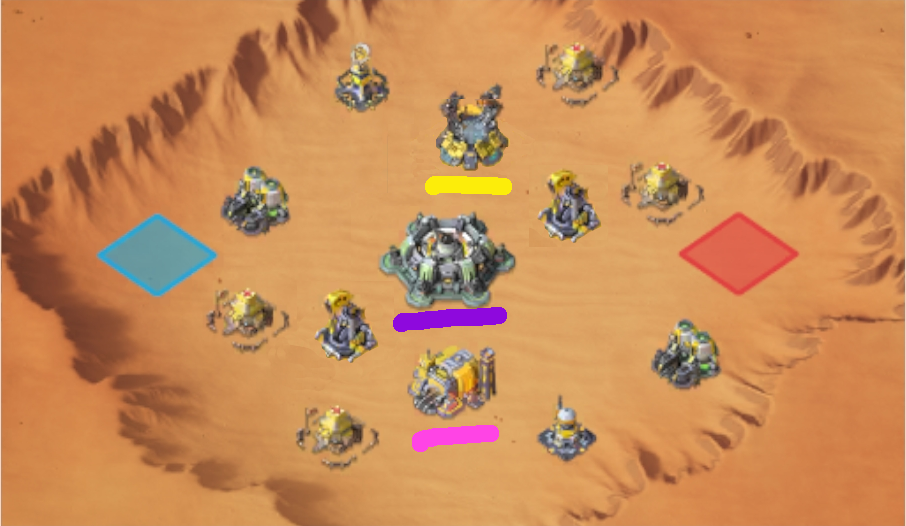
First let’s take a look at the whole map (the map was created during the preparation stage): you will start on the left where the blue pins are located. Your opponents will be on the opposite site, they are not shown on the map.
Battle Map
You can access the map view at any time during the game by clicking the “Battle Map” button, which features a magnifying glass icon.


The small map view is also very useful during the battle, here a description of its elements:
- Your base is show as a green marker ( in the image it overlapping the building marker in the south-east)
- Buildings your alliance currently holds are shown as blue markers
- Buildings your opponent currently holds are shown as red markers
- Buildings that are not yet active, because they unlock at a later stage, are shown as a grey marker
- Buildings that are active but neutral, because not yet captured, are shown as yellow markers
- Small yellow dots on the map are Point Supply Boxes
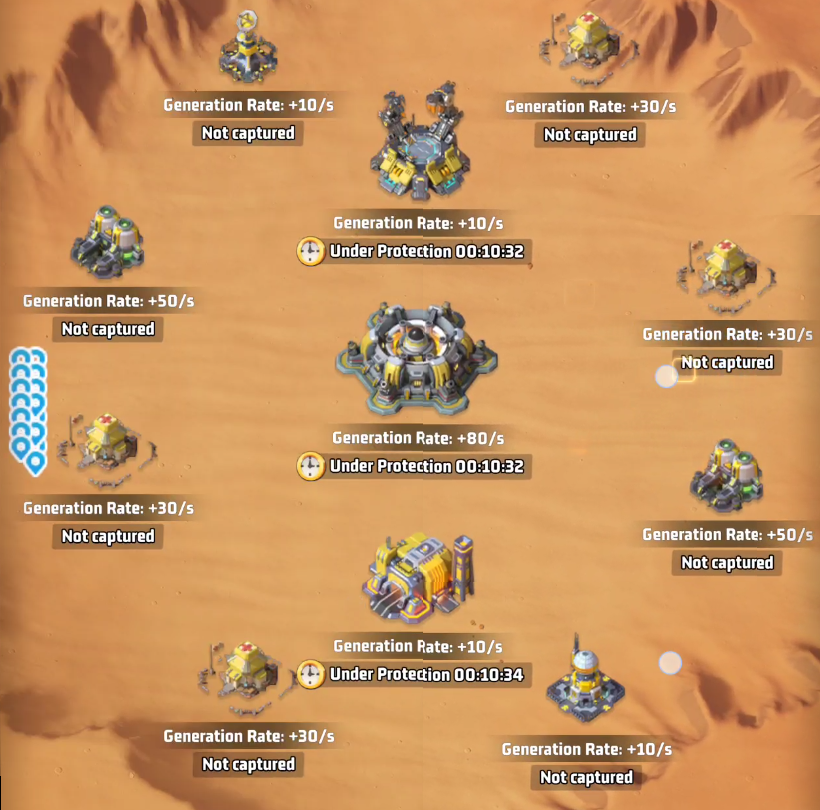
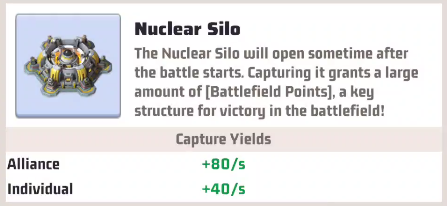
Nuclear Silo
It is the main structure of the game and it provides the highest amount of Capture Yields Battlefield Points per minute.
It is possible to capture it only starting from Stage 2, so after 10 minutes since the beginning of the game.
Details of Nuclear Silo

Location of Nuclear Silo on map
Once the building is held for more than 60 seconds, it will yield:
- non-plunderable Battlefield Points rate: 48/s
- plunderable Battlefield Points rate: 32/s
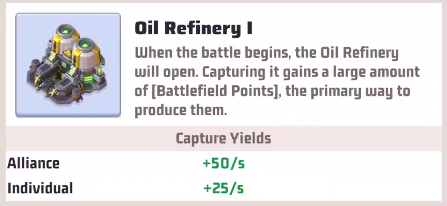
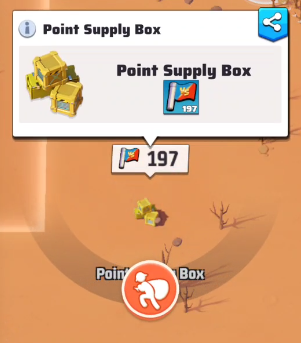
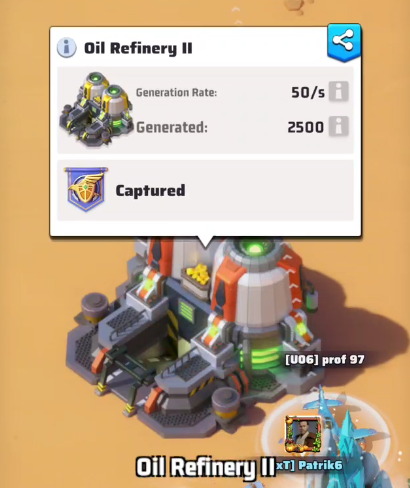
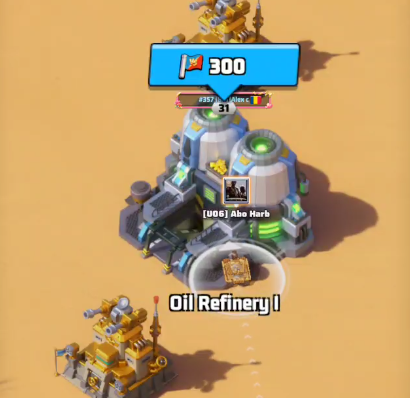
Oil Refinery I/II
There are 2 Oil Refinery structures, they are available since the beginning of the battle, and after Nuclear Silo they are the ones providing more Battlefield Points in Stage 1 so it is important to capture them.
Details of Oil Refinery
Location of Oil Refineries on map
Once the building is held for more than 60 seconds, it will yield:
- non-plunderable Battlefield Points rate: 30/s
- plunderable Battlefield Points rate: 20/s
Science Hub
This structure provides less points but it has a powerful boost:
- Increases cool down speed by 100%, this means the cool down for free teleport is reduced from 2 minutes to 1 minute.
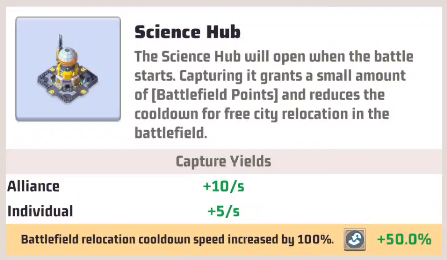
Details of Science Hub
Location of Science Hub: it is the one highlighted in yellow on the bottom right corner
Once the building is held for more than 60 seconds, it will yield:
- non-plunderable Battlefield Points rate: 6/s
- plunderable Battlefield Points rate: 4/s
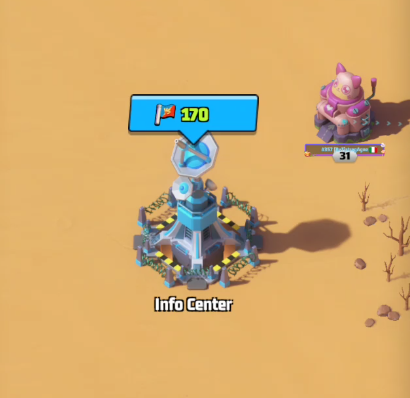
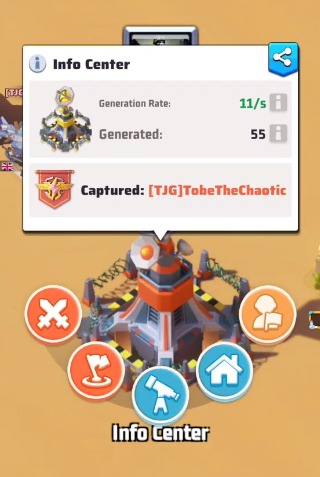
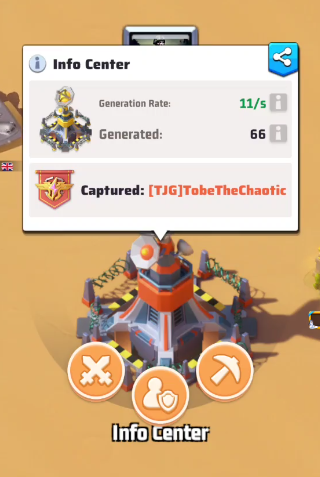
Info Center
This structure provides a powerful boost, as it will increase Battlefield Points output of all your captured buildings by 10%.
It can be a game changer to capture this building, also because if you don’t own it then probably your enemy will and so your enemy will earn 10% more points for each capture. It might make sense to give priority to this building.
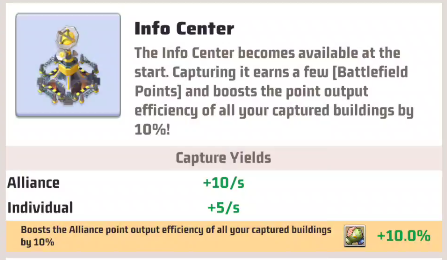
Details of Info Center
Location of Info Center: it is the one highlighted in yellow on the upper left corner
Once the building is held for more than 60 seconds, it will yield:
- non-plunderable Battlefield Points rate: 6/s
- plunderable Battlefield Points rate: 4/s
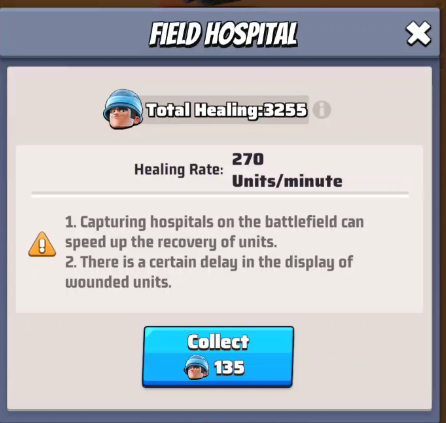
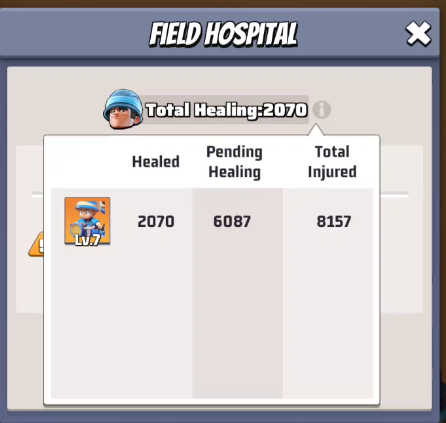
Field Hospital I/II/III/IV
Strategy wise these are the most important buildings to capture to ensure you will be able to keep fighting for the whole 30 minutes of the battle. In fact these buildings provide a healing boost that recovers 15 units of any level every 10 seconds for each owned Field Hospital. There are 4 Field Hospitals in total.
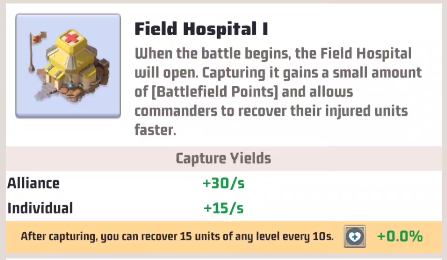
Details of Field Hospital
Location of Field Hospitals: there are 4 Field Hospitals on map
Once the building is held for more than 60 seconds, it will yield:
- non-plunderable Battlefield Points rate: 18/s
- plunderable Battlefield Points rate: 12/s
Use Field Hospital during the battle
If your team captured the field hospital it will heal your soldiers, to collect them go on the icon with the field hospital (house and the cross sign) ![]() on the lower left part of your screen, and collect each time new units are healed.
on the lower left part of your screen, and collect each time new units are healed.
Arsenal
Killing troops provides a huge amount of individual points, so capturing this building that boosts Heroes’ Attack, Defense and HP by 15% is a good way of increasing your individual points and also to have an edge in capturing buildings.
It is possible to capture it only starting from Stage 2, so after 10 minutes since the beginning of the game.

Details of Arsenal
Location of arsenal: above the Nuclear Silo
Once the building is held for more than 60 seconds, it will yield:
- non-plunderable Battlefield Points rate: 6/s
- plunderable Battlefield Points rate: 4/s
Mercenary Factory
This structure weakens your enemy with a reduce enemy Heroes’ Attack, Defense, HP by 15%.
It is possible to capture it only starting from Stage 2, so after 10 minutes since the beginning of the game.
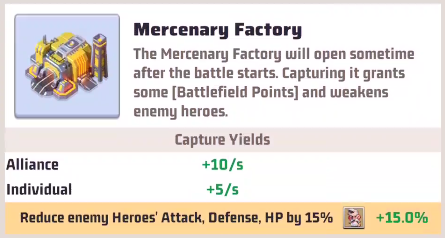
Location of Mercenary Factory: below Nuclear Silo
Once the building is held for more than 60 seconds, it will yield:
- non-plunderable Battlefield Points rate: 6/s
- plunderable Battlefield Points rate: 4/s
Oil Wells
These structures are similar to fields and mines of the game, you send squads and they gather resource, in this case points.
It is possible to capture it only starting from Stage 3, so after 13 minutes since the beginning of the game.
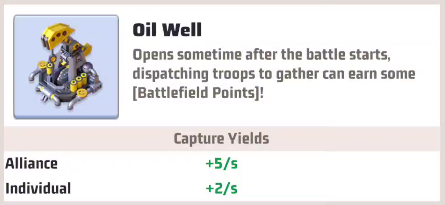
Details of Oil Well
Location of Oil Wells: structures highlighted in yellow
Point Supply Boxes
Point Supply Boxes, that are not buildings, are scattered from buildings when they change owner and there were plunderable Battlefield Points accumulated on them. Read the next paragraph to know more about plunderable points.
Once a Point Supply Box is collected, its points go directly to the alliance score as non-plunderable Battlefield Points.
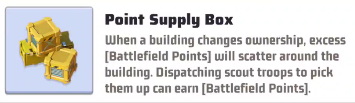
The amount of points they hold varies and depends on the amount of plunderable Battlefield Points that were available on the building that changed owner.
To collect them, click on them and send the recon Airplan through the “loot” button
Understanding Battlefield Points and how to plunder them
As we just saw, all buildings generate Battlefield Points, but part of the Battlefield Points can become plunderable.
For the first 60 seconds an alliance holds a building, that building will generate:
- non-plunderable Battlefield Points per seconds equal to the total capture yield of the building
After holding a building for more than 60 seconds, the building will generate:
- non-plunderable Battlefield Points per seconds equal to the 60% of the total capture yield of the building
- plunderable Battlefield Points per seconds equal to the 40% of the total capture yield of the building
So for example, let’s take a look at the Nuclear Silo:
- for the first 60 seconds an alliance holds it it will generate 80/s non-plunderable Battlefield Points
- after the 60 seconds only 48/s non-plunderable Battlefield Points will be generated, the remaining 32/s are plunderable
Non-plunderable Battlefield Points will be added every second to the total score of the alliance.
Plunderable Battlefield Points will be added every second to the total score of the alliance, BUT they are also tracked on the building and if the building gets plundered the amount of plundered Battlefield Points will be deducted from the current score of the defending alliance
The plunderable Battlefield Points will be scattered as Point Supply Boxes when the ownership of the building changes, and the alliance that collects those Point Supply Boxes will receive those points in the scoreboard.
Let’s see now all the possible situations a building can be, and let’s discuss the Battlefield Points for each of them.
Neutral building
This is a building that has not been captured yet
The game tells us that capturing it will give a +50/s capture yield of Battlefield Points.
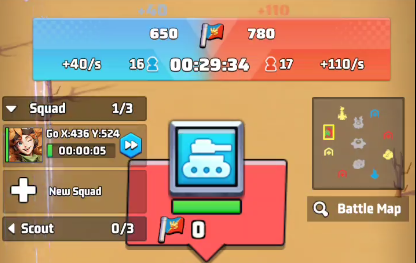
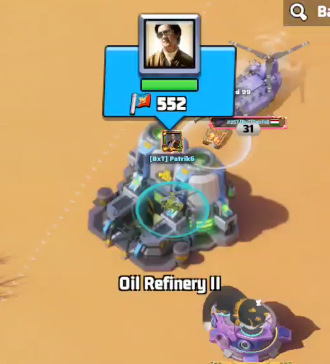
Captured building without plunderable Battlefield Points
Once a building is captured, you will see the main garrison player as avatar and a flag with a 0.
The 0 indicates that there are 0 plunderable Battlefield Points available on the building.
For the first 60 seconds the building is captured, it will generate non-plunderable Battlefield Points that are automatically added to the alliance score. But for the first 60 seconds no plunderable Battlefield Points will be generated.

Clicking on a building it is possible to see more details about the generated amount, specifically in this case it tells you:
- non-plunderable Battlefield Points generation rate 50/s
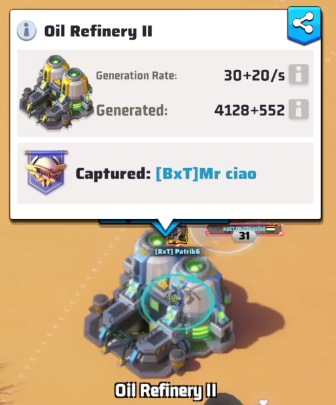
Captured building with plunderable Battlefield Points (after 60 seconds)
Once a building has been captured by an alliance for more than 60 seconds, the building will continue to generate Battlefield Points, but a part of those will become plunderable (specifically the 40% of the rate)
The number next to the flag on top of the building indicates the amount of plunderable Battlefield Points that the building holds currently and it increases every second.
Clicking on the building it is possible to see more details about the generated amount, specifically in this case it tells you both rates:
- non-plunderable Battlefield Points generation rate 30/s
- plunderable Battlefield Points generation rate 20/s
(The generated amounts may seem illogical since they are not multiples of 30 or 20, but this is due to the temporary boost provided by the Info Center to the alliance that captures it.)
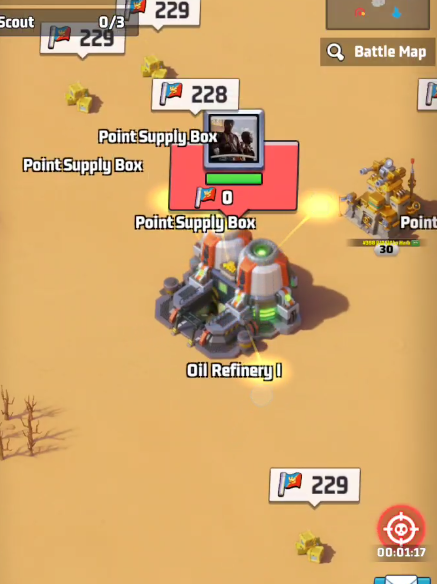
If the opposing alliance captures a building that you were holding for more than 60 seconds:
- the current plunderable amount of Battlefield Points on that building will be scattered into Point Supply Boxes nearby the building.
- the amount of plundered Battlefield Points will be deducted from your alliance score in the battle
- the alliance that collects the Point Supply Boxes will earn the corresponding Battlefield Points
- the plunderable Battlefield Points amount on the building goes back to 0, and they will start to accumulate only after 60 seconds.
In this image you can see 5 Point Supply Boxes being scattered (some are partially visible in the image).
If the building gets captured by the other alliance before the 60 seconds no Point Supply Box will be scattered because no plunderable Battlefield Points exist.
Captured building without garrison
Once a building has been captured, the players owning the building can remove the garrison, but the building will keep generating the Battlefield Points.
If more than 60 seconds have passed since the capture, also in this case plunderable Battlefield Points will be accumulated (as shown in the image).
If plunderable Battlefield Points are accumulated on the building and the opposing alliance captures the building, the plunderable Battlefield Points will be scattered.
Battlefield Points generation Boost
If your alliance holds the Info Center, the buildings you are currently holding will generate +10% of Battlefield Points / second.
You will understand that you are generating with the boost because the number of plunderable Battlefield Points will be written in green in that case on the building
A building generating normally Battlefield Points
A building generating extra Battlefield points thanks to the boost
In the scoreboard, the current Battlefield Points yields per second of the alliance holding the Info Center will be highlighted in green.
However it seems that in the scoreboard the rate becomes green with some delay or sometimes not at all, so don’t rely on it.
Battlefield/Individual Points cheat sheet
All the key information is condensed into this easy-to-read cheat sheet to help you strategize effectively.
Given that the non-plunderable/plunderable ratio after 60 seconds of holding the building is always the same (60%/40%), I avoided including this information in the table to keep it clean.
| Capture Yields | Available | Boosts | ||
| Structure | Battlefield Points | Individual Points | ||
| Nuclear Silo | +80/s | +40/s | Stage 2: After 10 min | |
| Oil Refinery | +50/s | +25/s | Immediately | |
| Field Hospital | +30/s | +15/s | Immediately | yes |
| Science Hub | +10/s | +5/s | Immediately | yes |
| Info Center | +10/s | +5/s | Immediately | yes |
| Arsenal | +10/s | +5/s | Stage 2: After 10 min | yes |
| Mercenary Factory | +10/s | +5/s | Stage 2: After 10 min | yes |
| Oil Wells | +5/s | +2/s | Stage 3: After 13 min |
Event Phases
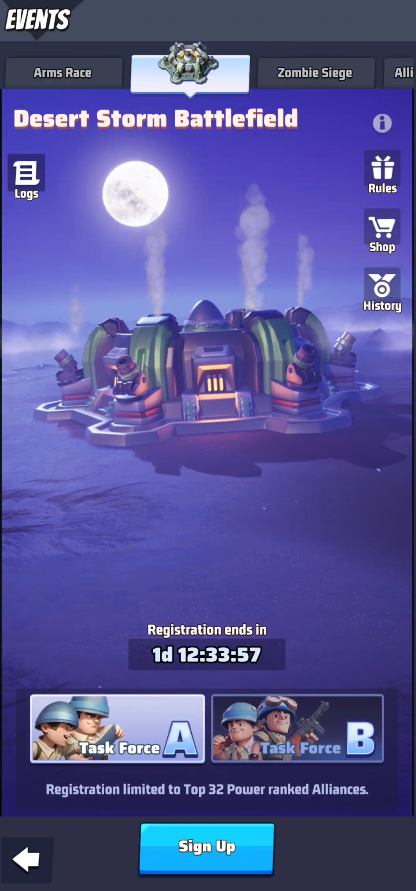
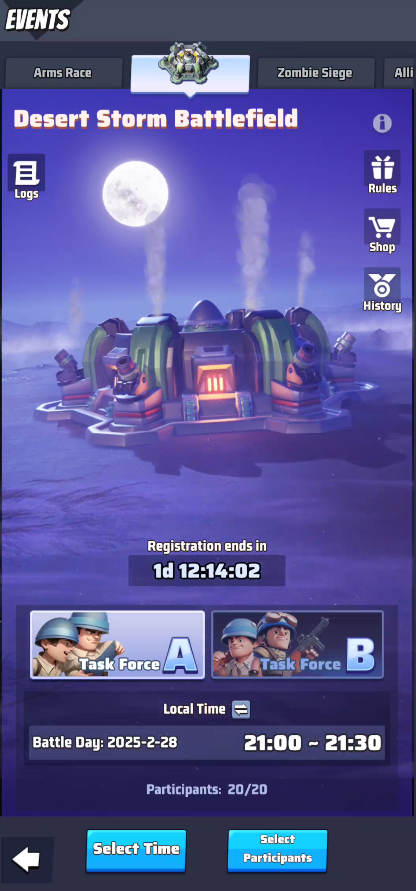
The Desert Storm event page is always available in the Event section and it will go through multiple phases.
- Registration: it starts on Monday and ends on Wednesday, so you have 3 days to prepare your task forces.
- Selection of competitor: On Thursday your competitor will be selected
- Waiting for the Battle: On Friday everything is set, and based on the selected time frame you will wait for the battle to start
- The Battle: May the best alliance win. The Battle happens on Friday.
- Rewards: based on the outcome rewards are distributed
Registration
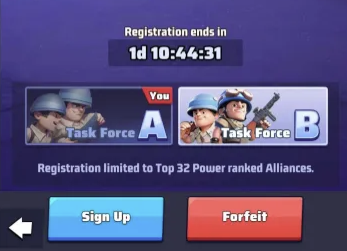
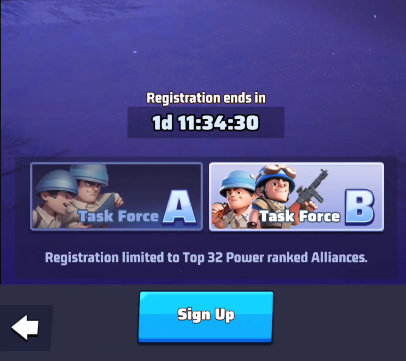
Only the top 32 Alliances in Warzone power rankings can join the event, and additionally the alliance must have been established for 7 days or more. Only players with bases over Lv. 15 are eligible!
The Registration phase goes from Monday to Wednesday.
During this phase:
- R4s/R5 can sign up task force A and/or task force B for Desert Storm Battlefield, specifying the time slots
- Players submit their request to fight selecting one of the task forces
- R4s/R5 will decide which request to fight to accept for both starting participants and substitute roles for the signed-up task forces
IMPORTANT:
- If a player is not selected as a starting participant or a substitute in this phase, that player will not be able to participate in the Desert Storm Battle. Not even R4s and R5 can change this.
- If a player joins an alliance, it is not possible for that player to submit request to fight in Desert Storm for 24 hours. Not even R4s can add that player to the participants until 24 hours have passed. So basically players joining on Wednesday are excluded from joining the task forces
Sign Up
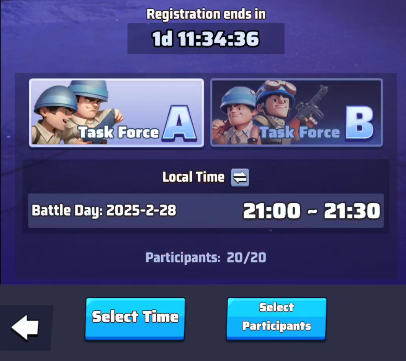
After reset on Monday the Desert Storm Battlefield event page will be ready. In this page it is possible to switch among Task Force A and Task Force B, they are managed as 2 separate things.
The alliance’s R4s and R5 can proceed to sign up the task forces they want to deploy for Desert Storm Battlefield, and “Sign Up” is the only available action on the event page.
There is a confusing part: every player, R1 to R5, will see the button “Sign Up”, and clicking on it they will see the Battle Time selection popup BUT only R4s and R5 can actually select one.
Before Sign up:
After Sign up is performed on the specific Task Force:
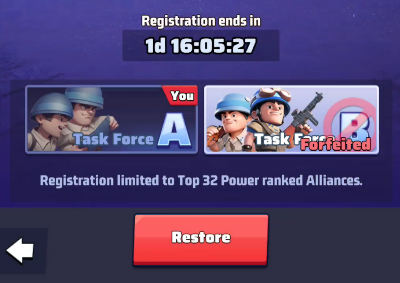
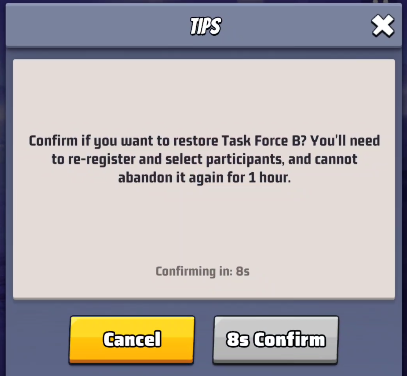
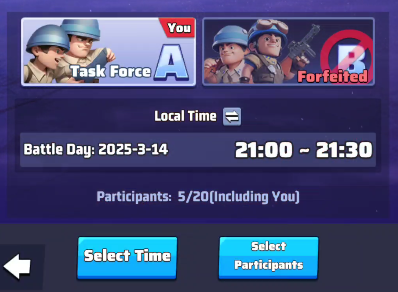
Forfeit Task Force B
It is also possible to forfeit Task Force B, this means only 1 battle will be done by your alliance.
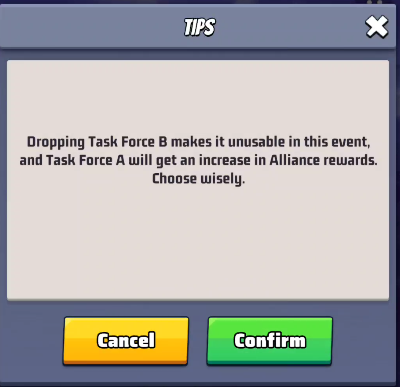
It is however possible to restore Task Force B:
There is a cool-down of 1 hour to forfeit it again.
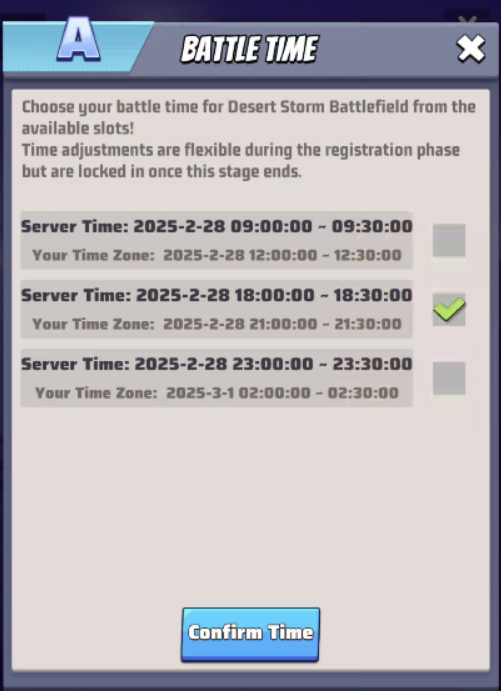
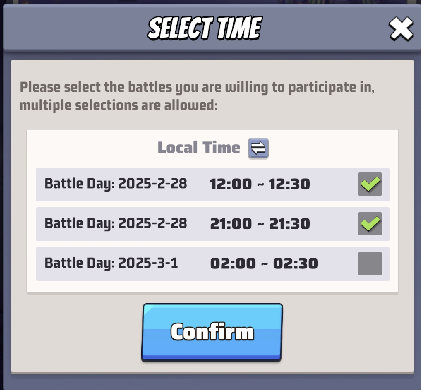
Battle Time Selection
R4s and R5 can decide the time the Battle will happen for each Task Force, the game will match your alliance’s task forces against other alliances’ task forces with the same time slot.
The Battle Time selection popup will be shown clicking on the “Sign up” button, or afterwards clicking on “Select Time” button.
R4s and R5 can adjust the battle time throughout the whole registration phase, but they should ensure that those already registered are available for the new time slot.
Request to fight
Once the battle time is set for a Task Force, it will be shown in the Desert Storm event page.
Clicking on Task Force A and Task Force B you can switch among them, and players can click on “Select Participants” to submit their “Request to fight” for that specific Task Force.
As already said, the 2 task forces are managed separately, R4/R5 can specify different times of battle for each task force.
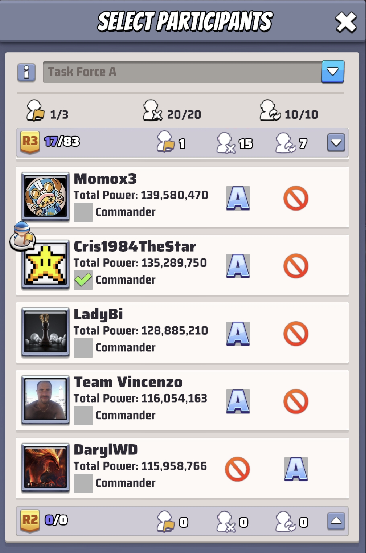
Clicking on “Select Participants”, players will be shown the popup with the summary of participants.
Here you can find a summary of how many people are participating and in which role:
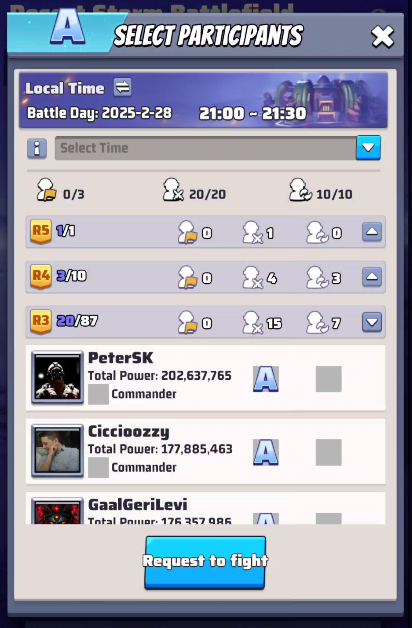
Clicking on “Request to fight” button, players can submit their request, choosing the time ranges for which they are available. Here players should only select the time slots for which they are available.
IMPORTANT: Submitting the “Request to fight” does not automatically grant the participation to the Desert Storm battle, because R4s and R5 must accept the request to fight adding the player to the task force either as starting participant or substitute
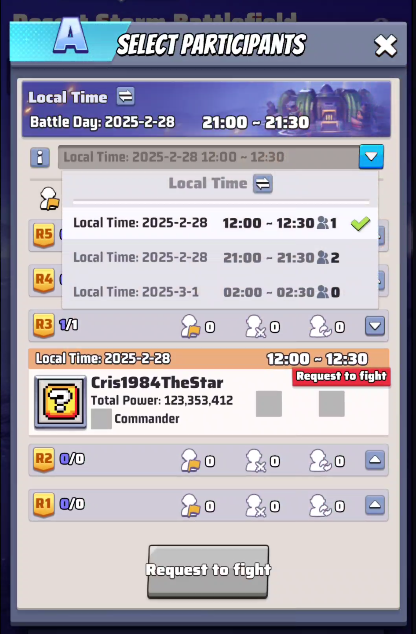
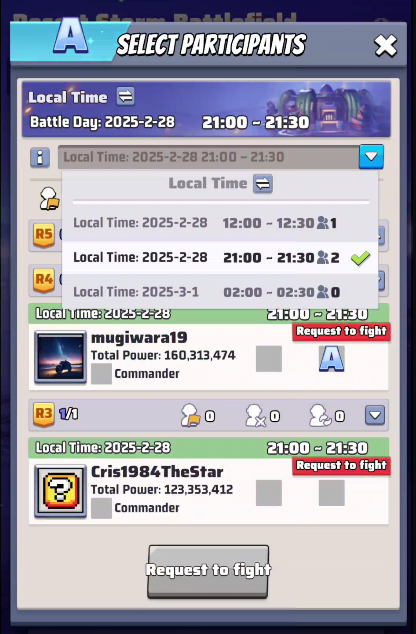
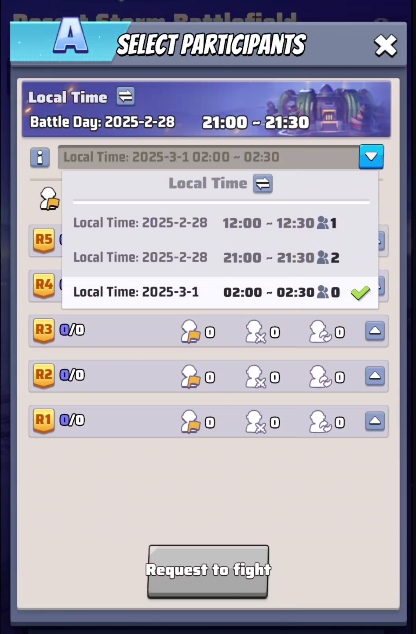
Once players submit their request to fight, their request will be visible in the “Select Participants” popup. It is possible to switch among the different time ranges to see the submitted availability of each player.
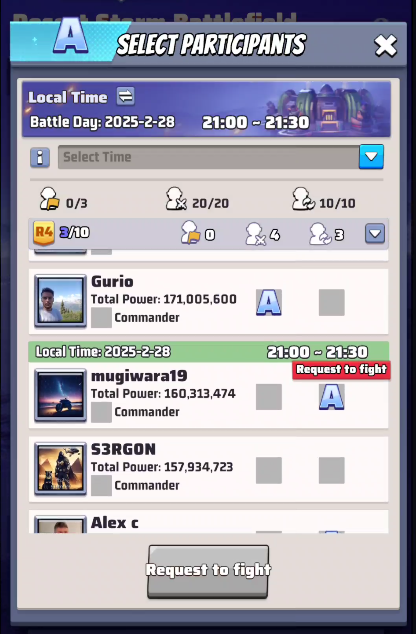
In the images below you can see:
- Cris1984TheStar player requested to fight in time slot “12:00-12:30”. But he was still not yet added to the task force.
- In time slot “21:00-21:30”: Cris1984TheStar player requested to fight. Mugiwara19 player requested to fight and he was already added to the Task Force A as substitute player.
- No player submitted request to fight for time slot “02:00-02:30”
In this other image you can see:
- Gurio: selected as Starting Player
- mugiwara19: requested to fight and he was added as substitute player
- S3RGON: he did not yet submit request to fight and he was not added by R4/R5 to the task force
R4/R5 will see all the requests made, and if the current selected time slot has not enough players available they could choose to change the specific Task Force battle time to match the highest participation requests.
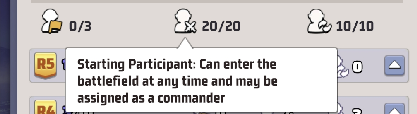
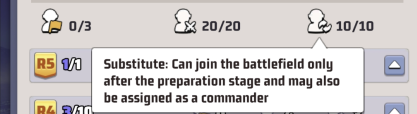
It is possible to add up to 20 starting participants and up to 10 substitutes for each Task Force.
Players can participate only in one of the Task Forces.
Once you are added to a Task Force either as starting participant or as a substitute, there will be a red “You” ribbon shown on the corresponding Task Force.
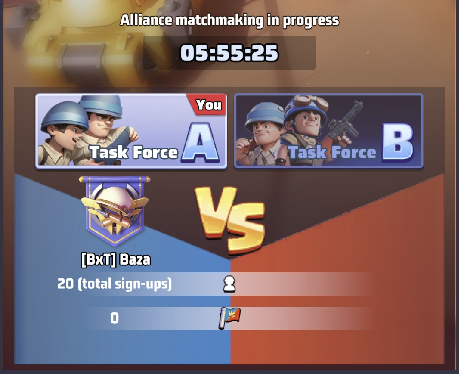
Selection of Competitor
On Thursday, starting from reset, the selection of competitor phase starts and it lasts 6 hours.
During this phase there is nothing to do, and the game will take time to match your task forces against other task forces.
IMPORTANT: It was confirmed by staff/devs that removing decorations or artificially dropping the alliance total power is useless, because the game will use the historical total power of the alliance for the matchmaking.
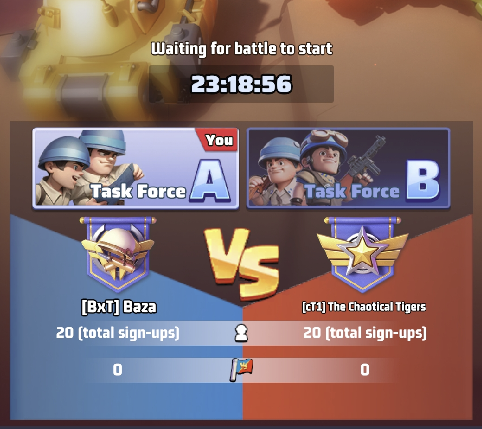
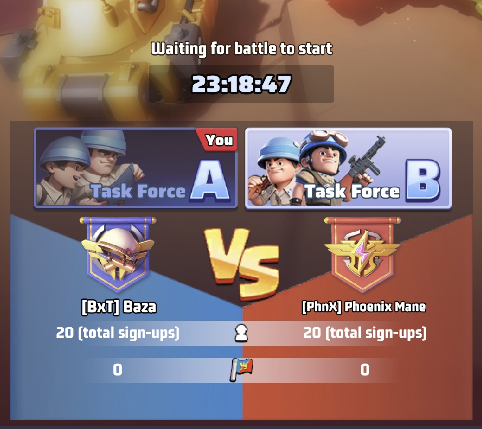
Waiting for the Battle
On Thursday, at 06:00 server time, the result of the selection of the competitors is shown.
For each Task Force you will be able to see:
- If you are among the starting players or substitutes there will be a red “You” ribbon shown on the corresponding Task Force
- The competitor alliance for the corresponding Task Force, along with the number of participants
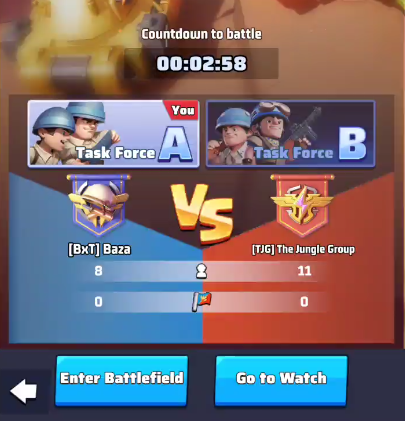
The Battle
The Battle lasts 30 minutes (+5 for preparation stage) and it is structured in Stages:
Preparation Stage (5 minutes): Participants from both sides can enter the battlefield’s safe zone. Your side will be marked in blue, the enemy in red. You can’t be attacked in the safe zone.
Stage 1(At game start): Capture Oil Refineries, Science Centers, Info Centers, and Field Hospitals to earn Battlefield Points
Stage 2 (10 minutes after game start): Capture the Nuclear Silo, Arsenal, and Mercenary Factory to gain Battlefield Points
Stage 3 (13 minutes after game start): Oil Wells will appear on the map, harvest them to get Battlefield Points
End of Battle (at 30 minutes after battle start)
The side with the most Battlefield Points at the end of the countdown of 30 minutes wins the battle
Preparation Stage
Preparation Stage lasts 5 minutes, during which all starting participants can join the Battlefield 5 minutes before the official battle time. Substitute can enter only once the battle starts if a spot is available.
To enter the battlefield go on the Desert Storm event page, select the Task Force in which you are recruited (the one with the red “You” ribbon) and click on “Enter Battlefield“. If you are not part of that specific Task Force you can however click on “Go to Watch” to observe the battle taking place.
IMPORTANT to be able to enter the battlefield:
- The player’s base should not be on the Contaminated Land near the Capitol
- The player’s base should not be on a different warzone (for example during a season you can teleport to different warzone)
Once you enter the battlefield during the Preparation Stage, you will see the countdown of this stage right below the scoreboard.
During these 5 minutes you cannot move from the safe zone, you should use this time to become familiar with the battlefield or to set up your squads.
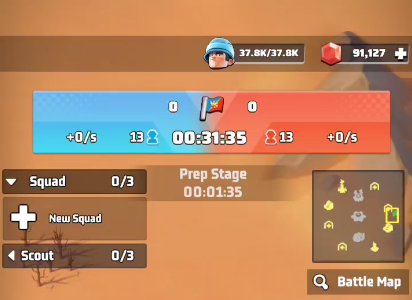
In the bottom left part of the screen you will see a few buttons:
- The House+gear symbol allows you to access your wall and configure which squad is set as defense
- The gear symbol allows you to access your squads and reconfigure them, choosing which heroes to deploy
- The House+cross symbol allows you to access the Field Hospital, check out this section to know more about it
- The Heart symbol opens the hospital
- And the last symbol allows you to teleport in the Battlefield. Once a teleport is used, a countdown to the next time you can use the teleport appears

Stage 1
Once the Preparation Stage ends, the real battle begins!
The buildings that are available right at the beginning are the once underlined in this picture:
- red: Oil refineries, these are very important buildings because they give you a huge amount of Battlefield and Individual Points
- blue: Field Hospitals, holding these buildings allow your injured troops to heal, allowing you to fight longer
- green: Info Center, holding it allows you to gain +10% points from the buildings you are holding
- orange: Science hub, holding it lowers the teleport cool-down from 2 minutes to 1 minute
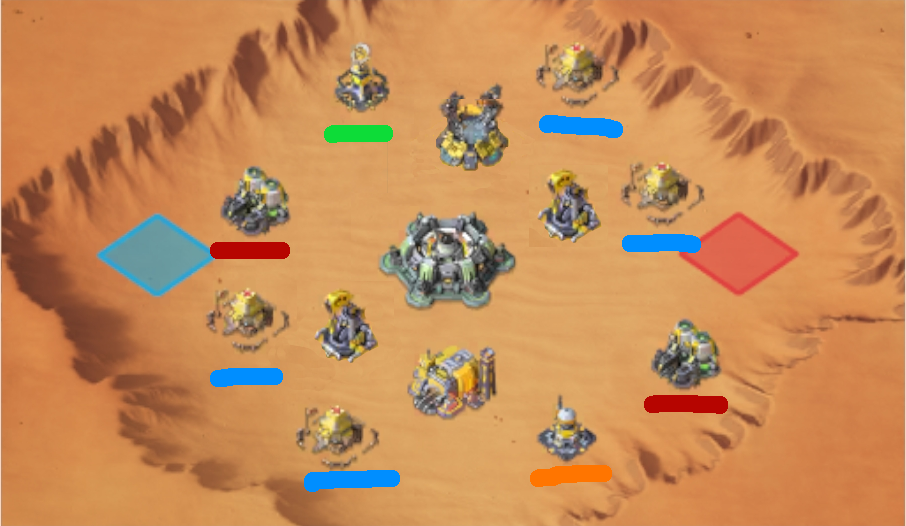
The optimal strategy would be to send your allies in teams to occupy oil refineries, and then to capture at least 1 or 2 field hospitals.
Given that there are also the Info Center and the Science Hub in this stage, I would suggest to give priority to the Info Center, increasing therefore the output of points by 10%.
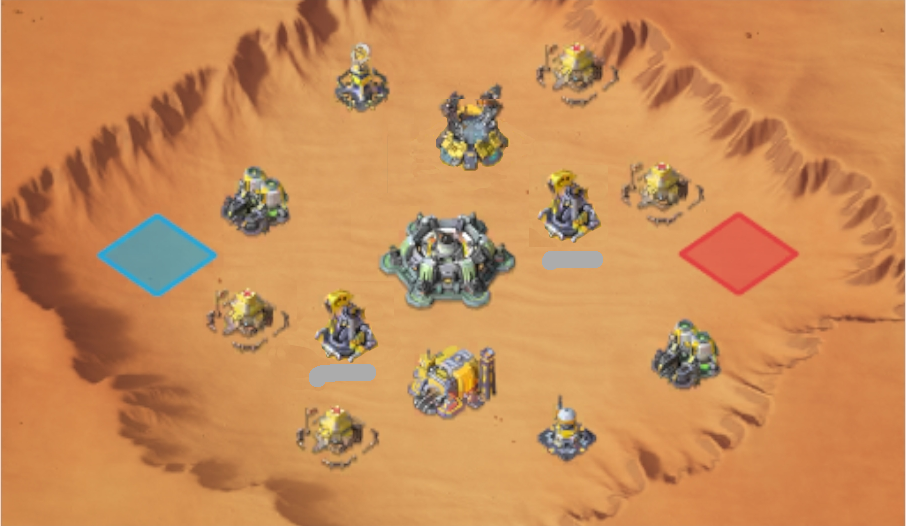
Stage 2
At 10 minutes after game start, 3 new building unlock:
- purple: Nuclear Silo, holding it is fundamental to ensure to gain a lot of Battlefield and Individual points
- pink: Mercenary Factory, reduce enemy Heroes’ Attack, Defense and HP by 15%
- yellow: Arsenal, boosts Heroes’ Attack, Defense and HP by 15%
The optimal strategy during this phase it to send your heavy hitter to occupy the Nuclear Silo. The Mercenary Factory and the Arsenal give good boosts, but if to capture them you have to spend a lot of troops, it is better in my opinion to use those troops to attack and defend the Nuclear Silo.
Stage 3
At 13 minutes after game start, the last buildings unlock:
- grey: Oil wells, send squads to gather to earn points
This should be your last resort, if you are low on troops and you still need individual points to get individual rewards.
End of Battle
Once the battle countdown reaches 0, the alliance with the highest amount of Battlefield Points, as shown on the scoreboard, wins!

Substitutes
During Preparation stage, all starting participants can enter the battlefield, while substitutes need to attend the actual start of the battle.
Once the Battle has started (Stage 1), if a spot is available in the team, substitutes (and also starting participants that didn’t enter before) can enter the battlefield and participate in the war. At each moment it is possible to have only a maximum of 20 players participating, if there are already 20 players fighting, it is necessary to wait for a player to exit the battlefield.
The amount of players fighting for each team is visible in the scoreboard. As you can see here they are 19 for you team (blue team), while they are 18 for the opponent team (red team).
So in this case 1 player could join your team to fight.
When a player finished all the troops, or if the player wants to exit the battle to allow other allies to participate and earn individual rewards, it is important to follow these steps:
- Click on the scoreboard
- Click on “Leave Battlefield” and confirm
If a player does not follow these steps, substitutes can not take its place.
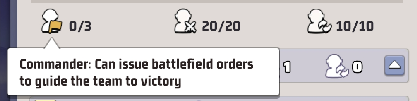
Commanders
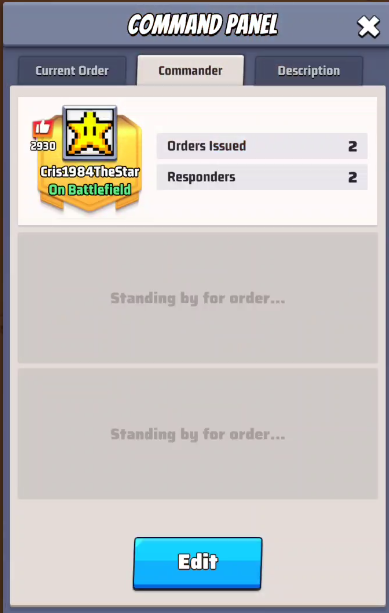
It is possible to assign the “Commander” role to players.
Commanders have the ability to give orders to the team, optimizing the strategy to effectively dominate the battlefield.
During registrations, in the select participants page, commanders can be identified by the selected checkbox “Commander”.
It is possible to assign the Commander role to up to 3 players for each Task Force.

Commanders have a special feature in the bottom left of the screen.
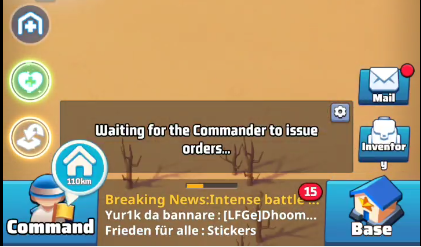
Once you click on the Command button, you can see what orders where issued and how many players are participating in the issued order.
Now clicking on the building listed in that section, you can jump to that building.
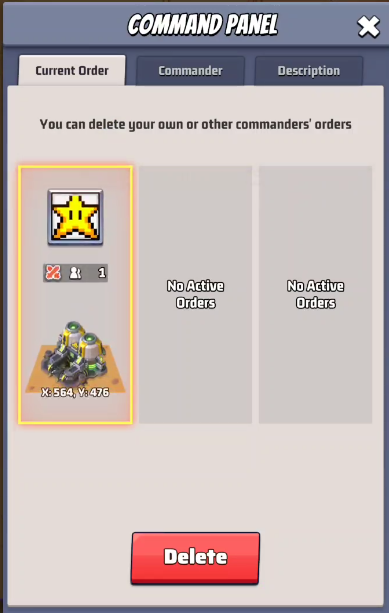
Commander panel
Clicking on the gear symbol of the commander area it is possible to access the commander Panel.
In the Commander panel, active orders are visible, and Commanders can delete orders that were issued.
Issue orders
Issuing orders is quite simple:
- The commander clicks on a building
- Then he click on the additional button, with the icon of a commander
- From here he can issue an order of attack, defend or gather
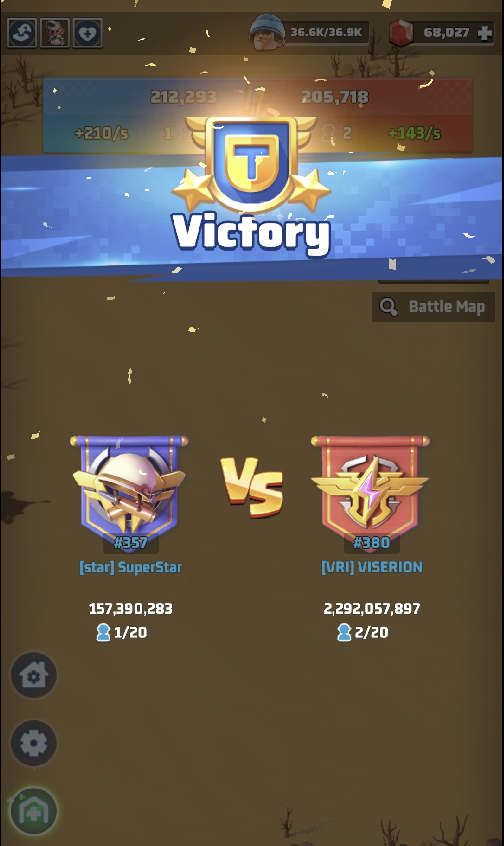
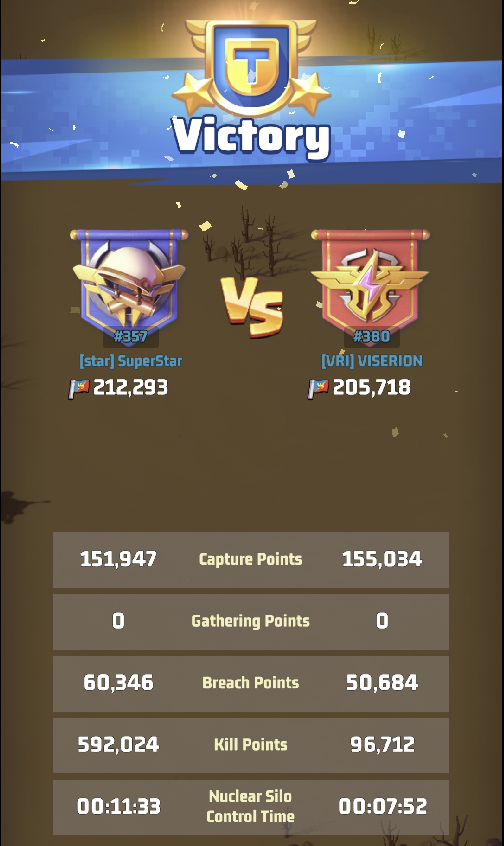
Results and rewards
Once the battle is over you will see the result of the winning team as described in the End of battle section.
You will also receive results via mail. For each Task Force that your alliances sign up for you will receive separate communications. (unfortunately the mails are not very clear about which Task Force they are referring to)
The mail titles are very confusing, I will show below the mails for each rewards type.
Battle Result mail:
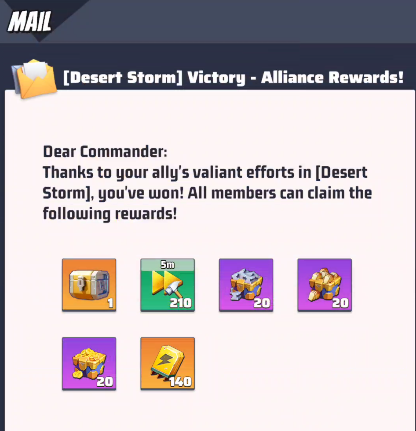
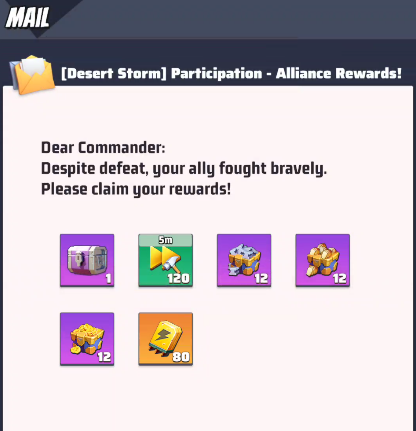
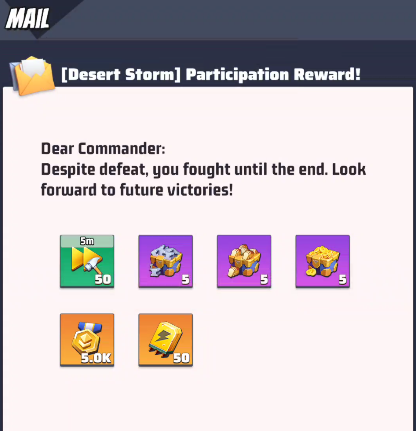
Alliance Rewards: you receive these rewards regardless of your participation in the battle
If the Alliance won the battle:
If the Alliance lost the battle:
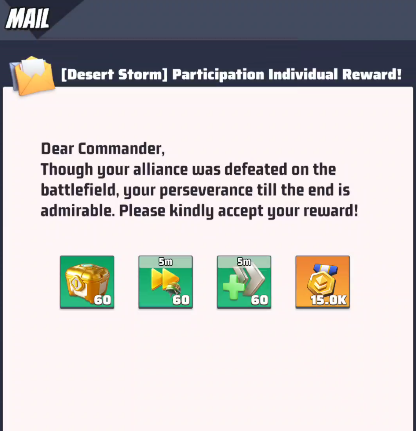
Individual Participation Rewards: you receive this only if you actually fought in a task force
Individual Rewards: you receive this only if you actually fought in a task force, and the rewards are based on your Individual Points
You can check the reference of the rewards here.
I am organizing a DS battle and suddenly I see the other team marked “forfeited”. How did that happen?
I don’t know, I haven’t used the Desert Storm as R4 recently.
kenapa aliansi saya tidak bisa mendaftar, padahal tidak terlambat
Maybe your alliance is new, it must be at least 7 days old.
Its mean no one been register on that team
they didn’t finalize their roster in time. so no roster = forfeit
Hello does it make a difference in rewards if team b losses and team a wins. I think there is some confusion with my leader thinking it’s better for the alliance to forfeit team b if not enough participation so that team a wins more rewards. I think he is confusing the suggestion to only have one team of a smaller alliance to keep at least one team full verses having an and b lose.. hope that makes sense.
Showing the registration process as in A B etc would be beneficial as it’s confusing
I have to review the whole guide, as soon as I do it I will also add the A/B registration process.
How to set base defense? Just leaving a squad in base?
You first need to enable the defense. Go in your base, click on the wall (the front gate of your base), click on the house icon with the + sign. Make sure you have a check sign on the squad you want to use as defense. Lastly the squad needs to be at the base to defend.
I’m confused about defending. If a weaker enemy is attacking you, should you defend then attack or not defend at all?
What not to do: In Desert Storm your troops are very precious so you shouldn’t do things that put them at risk.
Here some examples of what you shouldn’t do, as it will cause you most probably loss of troops:
1. If a weaker enemy is attacking you, wait with main squad in defense, then attack when his main squad is returning, instead of letting him burn you because your defense squads are out.
You said this is something that we should NOT do. Hence my confusion.
I get your confusion, I need to change that part. I actually need to re-write this guide considering the latest updates.
My suggestion is this:
Weaker enemies can make you lose troops only if they hit you and you either don’t have defense set or if you have defense set but the squad is out (supposing you set as defender only the main).
So if you see a weaker enemy start an attack wait with your main squad in base that is set as defense, the moment it hits you then you can attack
Thankyou this guide has been very helpful, I would like to ask when can we expect the revised updated version?
I revised the guide with the event info, I still didn’t rewrite strategy info about attacks. But I decided to take a break now, please read home page message
can A and B fight at different Times??
Yes, they are seen as 2 separate things. Even the opponent alliances will be different
Fantastic article! I’d love a deeper dive into the commanding side of things. Thanks.
We are not using that feature much in my main alliance… do you have any specific question about it?
Do we get troops based on oir drill capacity or what we currently have during Dessert Storm?
Yes, you get troops based on the maximum amount of your drill capacity at the highest level you can train.
Hallo und frohe Ostern, als erstes möchte ich sagen, dass die Beschreibung der Gebäude sehr hilfreich ist! 2. Hab ich eine Frage…. Ich habe es in den letzten Wochen öfter dass ich Zuwenig Anmeldungen habe für 2 komplette Teams(sprich 60 Personen) wenn ich die Chancen erhöhen will für den Sieg (so mein Gedankengang) Mache ich Team A voll mit 30 Personen und Team B hat dann zwar 18-20 Startspieler aber kein Reserve… Passt das System die Anzahl der angemeldeten Personen auch an?
Hi, thanks. The system will not change the registrations, only you decide who and how many commanders to add to each squad. It should however take into consideration the overall task force strength when it goes in the matchmaking phase, so if you have a weak team b it should match against a weak team b, but matchmaking is very bad in this game so I wouldn’t count on it.
can a person join both team at a different time?
No, you can only join 1 Task Force.
Once you have put in a request to fight, the button goes from blue to grey. Is it possible to change the requested times?
As far as I know you can’t. But you can text your R4/5 and request them to change your spot/time
Hello my over all strength is normally 26,000,000 but I’m going in at 16,500,000 does this affect my attack or defence capability s?
No, during Desert Storm you get full amount of troops at highest level you can train.
I would love to know all you know about matchmaking. For example, If you know only 18 people can join b team for sure. Is it better to just register those 18 to get a weaker opponent?
Matchmaking is really bad in this game, and there is no way of knowing what will happen if you register 18 or 20 people anyway. Just register those that guarantee presence
Hello I have one strong squad and three much weaker squads, should I use all four squads to attack with ?
Hi, in Desert Storm many remove troops from defense so even a weak squad can breach the enemy’s defense. So the answer is yes, use all 4 squads but first send recon plane to check the enemy’s defense setup.
Hi my alliance is going up against a alliance nearly double our strength tommorow. any tips ?
Share a strategy with your team mates, try to occupy at least one hospital to guarantee troop recovery. Focus on fewer buildings but with more people attacking. Consider also to conquer the info center (upper right left building) to have a 10% boost in points.
Hello thankyou for the tips last week, we still got smashed but at least we put up a good fight.
My question ? It’s better to team up with another commander and attack bases together are there any hidden drawbacks
to this strategy ? My forth game this week.
Last one the Winter Storm is about to start basically the same as DS ?
Different strategies work with different enemies. Pairing up with other players is a good strategy most of the times.
Winter storm and Desert storm have different timings.
Is there a way to see your opponents player’s list or stats ?
Usually people go through the trucks interface to find the opponent server and alliance, from there you can study their stats
Hello my alliances DS scores have improved greatly we have beaten two stronger opponents now. My problem is still the same several of our opponents we have been unable to locate or get intel about them before the match their alliance has not been found even searching all severs in the truck interface are we missing something??
Some people share locations of many other servers through chat using duel/season chat, you can try asking for their coordinates from there.
Hi! Can you somehow cancel your registration for Task Force B? I accidently do registration both Task A and B and our alliance only want to participate Task A.
Yes you can forfeit the Task Force B if you want. https://www.lastwartutorial.com/desert-storm/#forfeit-task-force-b
Does the substitute power come into play when assigning who we are battling against? Or are the match up based on the active participant players alone?
Is there any information about Desert Brawl over here?
No sorry, that is not covered yet in the guides.